[Day 34] computed, watch, 데이터 바인딩
Computed
computed는 계산된 데이터를 의미한다.
computed 속성은 data의 변화를 감지하여 동적으로 계산된 값을 이용할 때 사용된다.
const App = {
  data() {
    return {
      count: 3,
    };
  },
  computed: {
    double() {
      return this.count * 2;
    },
  },
};
const vm = Vue.createApp(App).mount("#app");
computed 옵션 안에 작성되어 있는 double 함수는 더 이상 함수가 아니라 계산된 데이터로 취급된다.
캐싱
위 예제와 동일한 결과를 내고 싶다면 computed 말고도 다른 방법이 더 존재한다.
- 표현식
<h2>{{ this.count * 2 }}</h2> - methods 옵션에 double 함수 생성하여 사용
<h2>{{ dobule{} }}</h2>
하지만 이 두 가지 방법은 한 번 계산 후 결과를 알고 있는데도 불구하고 계산이 다시 되고 있어 효율적이지 않다.
반면 computed 옵션은 캐싱이라는 기능이 있으므로 첫 번째 double 데이터를 출력할 때 값을 저장하고 나머지 출력에서는 캐싱된 데이터를 가져와서 사용한다.
이로 인해 반복적으로 출력해도 연산을 낭비하지 않는 장점을 가진다.
캐싱 추가 예제
<div id="app">
  <ul>
    <li v-for="todo in upperTodos">{{ todo.title }}</li>
  </ul>
</div>
<script>
const App = {
data() {
return {
todos: [],
};
},
computed: {
upperTodos() {
return this.todos.map((todo) => ({
...todo,
title: todo.title.toUpperCase(),
}));
},
},
created() {
fetch("https://jsonplaceholder.typicode.com/todos")
.then((res) => res.json())
.then((res) => {
console.log(res);
this.todos = res;
});
},
};
const vm = Vue.createApp(App).mount("#app");
</script>
데이터 의존
computed는 계산된 값을 사용하기 위한 내부의 데이터 값에 의존한다.
<div id="app">
  <h1>{{ user.name }}</h1>
  <h1>{{ upperName }}</h1>
  <h1>{{ user.age }}</h1>
  <h1>{{ doubleAge }}</h1>
</div>
<script>
const App = {
data() {
return {
user: {
name: "Leon",
age: 22,
email: "leon@abc.com",
},
};
},
computed: {
doubleAge() {
console.log("Double!!");
return this.user.age * 2;
},
upperName() {
return this.user.name.toUpperCase()
}
},
};
const vm = Vue.createApp(App).mount("#app");
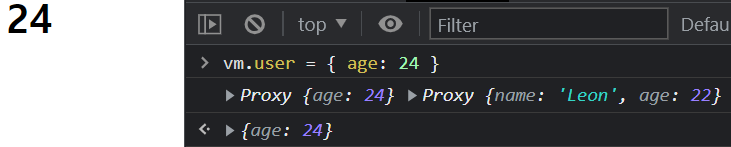
</script>위 예제에서 doubleAge라는계산된 데이터는 user 객체 데이터의 age 속성에 의존하고 있다.
따라서 age가 바뀌면 doubleAge는 다시 연산된다.
계산된 데이터는 의존하는 데이터에만 포커싱된다.
그 외의 데이터가 바뀌는 것에 따라 계산된 데이터가 다시 연산되지는 않는다.
Getter, Setter
<div id="app">
  <h1>{{ fullName }}</h1>
  <h2>{{ firstName }}</h2>
  <h2>{{ lastName }}</h2>
</div>
<script>
const App = {
data() {
return {
firstName: "Leon",
lastName: "Moller",
};
},
computed: {
fullName() {
return `${this.firstName} ${this.lastName}`;
},
},
};
const vm = Vue.createApp(App).mount("#app");
</script>
위 예제에서 fullName에 데이터를 할당해도 바뀌지 않는 것을 볼 수 있다.
계산된 데이터이기 때문에 의존하고 있는 firstName이나 lastName이 바뀌지 않으면 fullName도 변하지 않는다.
하지만 필요에 의해 값을 변경해야 할 경우 setter를 사용하여 변경할 수 있다.
computed: {
  fullName: {
    get() {
      return `${this.firstName} ${this.lastName}`;
    },
    set(newValue) {
      const names = newValue.split(" ");
      this.firstName = names[0];
      this.lastName = names[names.length - 1];
    },
  },
},
Watch
watch는 반응형 데이터를 감시하여 데이터가 변경이 되면 지정한 로직을 실행시킬 수 있다.
// watch 옵션의 내부 함수 이름은 반응형 데이터의 이름과 동일
watch: {
  firstName(newValue, oldValue) {
    console.log("watch firstName", this.firstName);
    console.log("watch firstName", newValue, oldValue);
  },
  fullName() {
    console.log('watch fullName', this.fullName);
  }
},
firstName이 변경되자 의존을 가지고 있는 fullName이 변경이 되고 watch에서 지정한 로직을 수행하는 것을 볼 수 있다.
deep
<div id="app">
  <h1>{{ user.age }}</h1>
</div>
<script>
const App = {
data() {
return {
user: {
name: "Leon",
age: 22,
},
};
},
watch: {
user(newValue, oldValue) {
console.log(newValue, oldValue);
},
},
};
const vm = Vue.createApp(App).mount("#app");
</script>
watch로 감시하는 데이터가 참조형 데이터인 경우 내부의 참조값이 변경되면 감지하지 못한다.
이럴 때 사용할 수 있는 것이 deep 옵션이다.
watch: {
  user: {
    handler(newValue, oldValue) {
      console.log(newValue, oldValue);
    },
    deep: true,
  },
},
deep 옵션을 통해 내부 참조값의 변경 여부를 감시할 수 있다.
immediate
<div id="app">
  <button @click="capitalize">Capitalize</button>
  <ul>
    <li v-for="fruit in fruits">{{ fruit.name }}</li>
  </ul>
</div>
<script>
const App = {
data() {
return {
fruits: [
{ id: 1, name: "Apple" },
{ id: 2, name: "Banana" },
{ id: 3, name: "Cherry" },
],
};
},
watch: {
fruits: {
handler() {
console.log(this.fruits);
},
deep: true,
immediate: true,
},
},
methods: {
capitalize() {
this.fruits.forEach((fruit) => {
fruit.name = fruit.name.toUpperCase();
});
},
},
};
const vm = Vue.createApp(App).mount("#app");
</script>immediate 옵션을 통해 감시하는 데이터가 초기화 되었을 때 바로 실행되도록 설정할 수 있다.
Class 데이터 바인딩
객체 리터럴
HTML의 클래스 속성에 데이터를 연결할 때 객체 리터럴로 적을 수 있다.
class에 v-bind를 통해서 객체 데이터를 직접 연결할 수 있다.
<div id="app">
  <h1 :class="{ active: isActive, color, 'title--small': isSmall }" class="title">{{ name }}</h1>
</div>
<script>
const App = {
data() {
return {
name: "Jay",
isActive: false,
color: "red",
isSmall: true,
};
},
};
</script>color: key와 value의 값이 같다면 단축 속성명을 사용할 수 있다.'title--small': 특수 문자가 있을 경우에는 따옴표로 묶어서 작성해야 한다.
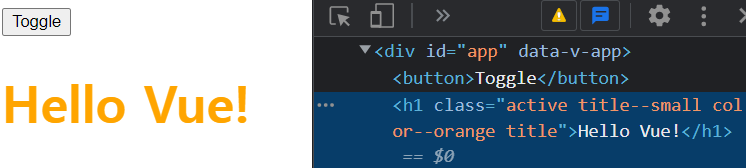
먄일 객체 데이터 내부에서 반응형 데이터를 활용해야 한다면 객체 데이터를 계산된 데이터로 만들어서 this 키워드로 각각의 반응형 데이터를 사용하면 된다.
 <div id="app">
  <button @click="toggle">Toggle</button>
  <h1 :class="classObject" class="title">{{ msg }}</h1>
</div>
<script>
const App = {
data() {
return {
msg: "Hello Vue!",
active: false,
small: true,
};
},
computed: {
classObject() {
return {
active: this.active,
"title--small color--orange": this.small,
};
},
},
methods: {
toggle() {
this.active = !this.active;
},
},
};
const vm = Vue.createApp(App).mount("#app");
</script>반응형 데이터가 수정될 때마다 classObject라는 계산된 데이터도 갱신이 되어 적용된다.
배열 리터럴
배열 리터럴을 이용하여 클래스의 값을 동적으로 바꿔줄 수 있다.
<div id="app">
  <h1 :class="[active, title]"
      @click="changeTitle">Hello Vue!</h1>
</div>
<script>
const App = {
data() {
return {
active: "active",
title: "title",
};
},
methods: {
changeTitle() {
this.title = "title--large";
},
},
};
const vm = Vue.createApp(App).mount("#app");
</script>
Style 데이터 바인딩
데이터를 바인딩해서 동적으로 스타일을 제어해야 할 경우에는 inline style 방식이 권장된다.
객체 리터럴
<div id="app">
  <h1 :style="styleObject" @click="toBlue(); increaseWidth()">
    Hello Vue!
  </h1>
</div>
<script>
const App = {
data() {
return {
color: "red",
width: 200,
};
},
computed: {
styleObject() {
return {
color: this.color,
width: `${this.width}px`,
};
},
},
methods: {
toBlue() {
this.color = "royalblue";
},
increaseWidth() {
this.width += 10;
},
},
};
const vm = Vue.createApp(App).mount("#app");
</script>@click="toBlue(); increaseWidth();: 클릭 이벤트에 여러 함수를 지정하기 위해서는 인라인 메소드 방식으로 작성한다.
배열 리터럴
여러개의 객체 데이터를 연결할 때 배열 리터럴을 활용할 수 있다.
<div id="app">
  <h1 :style="'background-color': backgroundColor">Hello Vue!</h1>
</div>
<script>
const App = {
data() {
return {
backgroundColor: "red",
};
},
};
const vm = Vue.createApp(App).mount("#app");
</script>'background-color': backgroundColor 코드는 backgroundColor로 바꿀 수 있다.
VueJS가 자동으로 변경해주기 때문에 카멜 케이스를 사용해도 된다.
객체를 배열의 아이템으로 나열할 때는 작성하는 순서에 따라 중복되는 css 속성이 어떤 값으로 쓰여질지 결정된다.
배열에서 더 나중에 작성되는 객체의 중복되는 css 속성값이 사용된다.
<div id="app">
  <h1 :style="[styleObject, titleStyleObject]">Hello Vue!</h1>
</div>
<script>
const App = {
data() {
return {
styleObject: {
color: "royalblue",
backgroundColor: "orange",
},
titleStyleObject: {
fontSize: "40px",
fontWeight: "bold",
},
};
},
};
const vm = Vue.createApp(App).mount("#app");
</script>

출처: 프로그래머스 프론트엔드 데브코스
[Day 34] Vue (2)